dogbone_tensile_specimen_synthesizing.pdf
1.Purpose:
The purpose of this protocol is to offer a guideline for synthesizing dog-bone shape tensile specimens of SMPs, which are suitable for standard uniaxial tension experiments.
2. Materials and Equipment:
tert-Butyl Acrylate, Poly(ethylene glycol) Dimethacrylate, Di(ethylene glycol) Dimethacrylate, 2,2-Dimethoxy-2-Phenylacetophenone
Centrifuge Polypropylene Tubes (50ml), Tube Racks, Balance, Pipette, Pipet Tips, Transfer Pipets with Standard Bulb, Vortex Genie 2 Mixer, Weigh Boats, Spatula, Heat- Resistant Borosilicate Glass Sheets (203mm*152mm*6mm), Rubber Sheets (3.1mm thick), Clips, Knives, Vacuum Oil, UV Oven, Incubator, Refrigerator, Laser Cutter
3.Steps:
(As an example, the following steps are for the synthesizing of 10 wt% specimens. For 20, 40 wt% specimens the procedure is the same but with different chemical ratios, refer to Table 1. The absolute amount of each chemical is subjected to change based on the number of specimens need to be synthesized.)
Step1: Put the polypropylene tube on the balance, and then zero the balance. Step2: Transfer 1.24ml DEGDMA into the polypropylene tube using a pipette with
pipet tip. Measure the mass using the balance.
Step3: Change a new pipet tip. Transfer 2.84ml PEGDMA into the polypropylene tube using a pipette with pipet tip. Measure the mass using the balance. Make sure the mass ratio of DEGDMA: PEGDMA is 3:7.
Step4: Change a new pipet tip. Transfer 45.92ml tBA into the polypropylene tube using a pipette with pipet tip. Measure the mass using the balance. Make sure the mass ratio of DEGDMA: PEGDMA: tBA is 3:7:90.
Step5: Put a weigh boat on the balance. Zero the balance. Add the photoinitiator (2,2- Dimethoxy-2-Phenylacetophenone) to the weigh boat using a spatula until the mass of the photoinitiator is 0.1% of the mass of the polymer solution.
Step6: Add the photoinitiator to the polymer solution. Screw the cap on tightly. Put the tube on the mixer for 1-2 mins. Make sure the photoinitiator is fully dissolved.
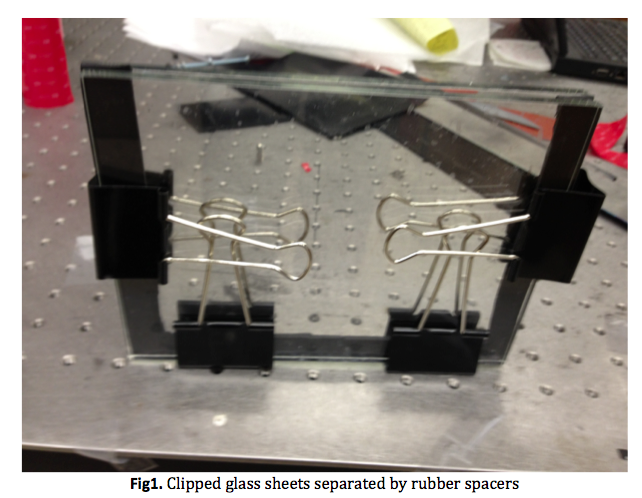
Step7: Sandwich three rubber sheets between two glass sheets along three lateral sides as spacers, leaving one side open. Secure the sealing of the three sides with vacuum oil. Clip two glass sheets together. (Fig.1)
Step8: Inject the polymer solution into the space between two glass sheets using a transfer pipet with bulb.
Step9: Put the clipped glass sheets into the UV oven.
Step10: Turn on the UV oven. Expose the glass sheets containing polymer solutions to UV light for 20 mins in total. For the first 10 mins, turn over the glass sheets every 1 minute to get a uniform exposure through the thickness. For the next 10 mins, do this every 5 mins.
Step11: Turn off the UV oven. Transfer the specimen into the incubator. Equilibrate at 70°C for 60-90 mins.
Step12: Cool down the specimen in a refrigerator. Remove the glass sheets to get the polymer sheet.
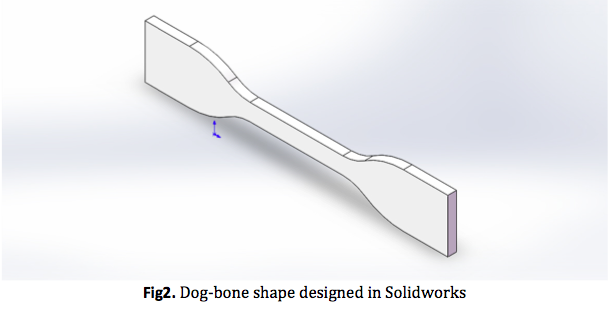
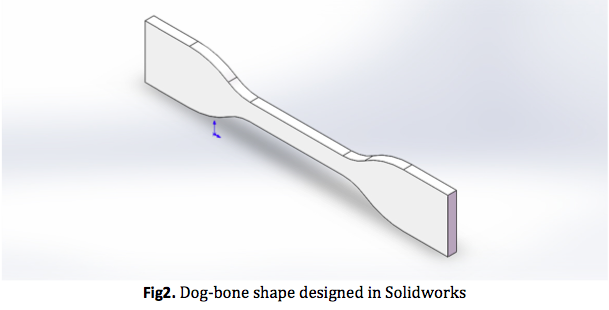
Step13: Design the dog-bone shape and make drawings in Solidworks. (Fig.2) Step14: Input the Solidworks drawings into the controller of the laser cutter. Use the
laser cutter to cut dog-bone specimens out from the polymer sheet.
| Mass Ratio (DEGDMA:PEGDMA: tBA) | Volume Ratio (DEGDMA:PEGDMA: tBA) | 50ml in total (DEGDMA+PEGDMA+ tBA) |
|---|---|---|
| 3:7:90 (10 wt%) | 2.7726:6.3694:102.8571 | 1.24ml+2.84ml+45.92ml |
| 6:14:80 (20 wt%) | 5.5453:12.7389:91.4286 | 2.53ml+5.81ml+41.67ml |
| 12:28:60 (40 wt%) | 11.0906:25.4778:68.5714 | 5.27ml+12.12ml+32.61ml |
Table1. Mass ratios and volume ratios of three chemicals for 10, 20 and 40 wt%

Fig1. Clipped glass sheets separated by rubber spacers
Fig2. Dog-bone shape designed in Solidworks

